Introduction
The past two years have been heavy for most of us due to the Covid-19 pandemic. With the introduction of vaccines, proper sanitisation and raising awareness about the infectious virus, casualties are decreasing and the world is returning to something resembling normality. But still, we have to keep up good practices since the virus keeps on mutating.
Wearing masks is an essential way to stop the spread of Covid-19. Most countries around the world have laws that people should wear masks, some or all of the time. In public, you're likely to see many people wearing masks, others will not wear them at all, and still others will wear them incorrectly. Hence the need for human effort to ensure that mask mandates and policies are obeyed.
In this article, we will go through a Knowledge competition hosted on Zindi where we are asked to build a machine learning model that classifies between people wearing a mask or not - best known as an Image Classifier. We will also we do a quick dive into computer vision for classification.
As defined in Grokking Deep learning for Computer Vision:
📌 Image classifier is an algorithm that takes in an image as input and outputs a label or “class” that identifies that image.
In this article, we will mostly use Python and the Keras framework.
The challenge is hosted on Zindi, and you can find the complete description and join the challenge here.
Type of Problem
This is a classification problem where we are dealing with image data, which is an application of Computer Vision.
According to Computer Vision with Python By Oreilly:
📌 Computer vision is the automated extraction of information from images. Information can mean anything from 3D models, camera position, object detection and recognition to grouping and searching image content.
IBM also gives a good definition to the related subject:
📌 Computer vision is an artificial intelligence field that enables systems and computers to derive meaningful information from digital images, videos and other visual inputs — and take actions or make recommendations based on that information.
Images are broken down into pixels which are the smallest unit of information that make up the picture. You have to understand the bigger picture of how to extract information from pixels and interpret what they represent.
Computer vision technology thrives in real-world applications such as facial recognition, augmented reality, self-driving cars, visual search, optical character recognition etc. Computer vision technology has been growing rapidly due to advancements in AI and deep learning - this has resulted to smarter applications in the industry.
Python supports tasks in computer vision well, by providing us with excellent libraries for building these models. Some of the libraries that should cross your mind when working on computer vision tasks are:
- OpenCV - This is a popular library used for image processing and computer vision. Deep learning algorithms related to computer vision can be implemented using this library.
- Python Imaging Library (PIL) - This library provides general image handling and lots of useful basic image operations like resizing, cropping, rotating, color conversion and much more.
- SimpleCV - This library uses computer vision libraries like the OpenCV. It is helpful for prototyping.
Computer Vision Pipeline
There are two approaches that computer vision systems cna take to analyze and model image data.
Machine Learning Flow
The first step is always to get the relevant data - in this case we specifically need image data.
- Preprocessing data - this involves methods like grayscale conversion, normalization, data augmentation, colour transformation etc.
- Feature extraction - this involves finding distinguishing characteristics about the images.
- Creating the ML model - learn from the trained data to make predictions on new data.
Good examples of this approach are support vector machine and random forest algorithms.
Deep Learning Flow
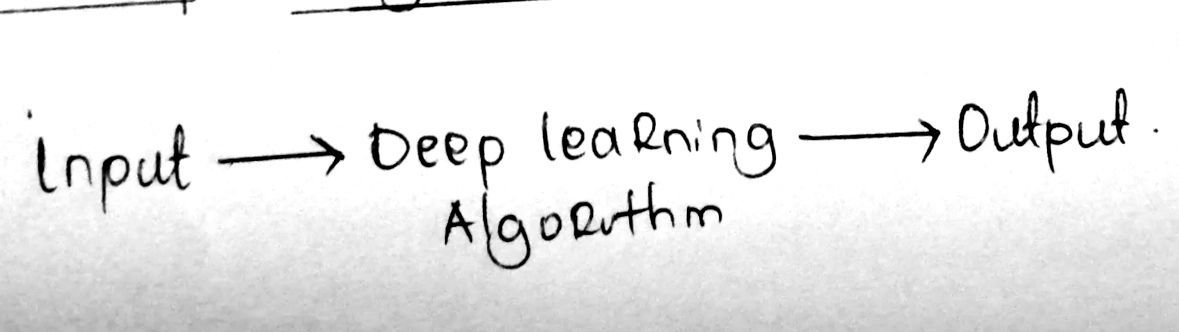
Deep learning algorithms have simplified the traditional machine learning flow. Deep learning is a special class of algorithms based on artificial neural networks. All deep learning algorithms are machine learning algorithms but not all machine learning algorithms are deep learning algorithms.
Deep learning automatically extracts features (feature engineering) while learning the importance of the features by applying weight to its outputs (feature importance).
As much as ML algorithms perform remarkably and give satisfactory results, when it comes to tasks like computer vision, deep learning algorithms are often preffered due to their extraordinary performance.
A good example of this application is in Convolutional Neural Networks (CNNs).
What are Convolutional Neural Networks?
CNNs (also known as convnets) are a type of deep learning model used in computer vision applications. Before we get into the challenge, it is important for us to understand how CNNs process input data to give us the final model. CNNs shine in processing and classifying images.
Layers in a CNN include:
- Input layer - The input layer reads the image. Images are represented by a 3D matrix - the dimensions are height, width and channels. The width and height shrink as you go deeper in the network.
- Convolutional layer - features of images such as edges are extracted within this layer.
- Pooling layer - this layer reduces the image dimension size. The objective of this layer is to reduce computational power when processing the data by reducing image sizes, which in the long run reduces chances of overfitting.
- Fully-connected layer - this layer classifies images between different categories by training - non-linear combinations of the high-level features as represented by the the output of the convolutional layer.
- Output layer - Contains the final label.
Popular activation functions used are ReLU (Rectified Linear Units) and Softmax.
📌 An activation function is a function used in artificial neural networks which outputs a small value for small inputs, and a larger value if its inputs exceed a threshold. If the inputs are large enough, the activation function "fires", otherwise it does nothing. In other words, an activation function is like a gate that checks that an incoming value is greater than a critical number. (Definition from deepai.org)
Softmax function maps outputs to a [0,1] range and ensures that for each output the total sum is 1.
ReLU is the default activation in CNN. It mimics neuron activations to introduce nonlinearity to values x>0 and returns 0 if values does not meet condition. ReLU helps models to learn faster and perform better.
Data Understanding
Now that we have reviewed some of the theory needed for this challenge, let’s get into the challenge itself. Zindi has provided us with different files to help us achieve our goal:
- Images.zip contains all the images, train and test images.
- train_labels.csv contains the list of images in the train set correctly labelled: 1 indicates an image with a person wearing a mask, 0 indicates a person without a mask.
- sample_submission.csv gives the format of how your submission file should look like.
First we need to import libraries:
# Importing the relevant libraries
import numpy as np
import pandas as pd
import cv2
import matplotlib.pyplot as plt
import random
from IPython.display import Image as ShowImage
# Keras libraries
from keras.models import Sequential
from keras.layers import Conv2D, MaxPooling2D, Dropout, Flatten, Dense, Activation, BatchNormalization,GlobalMaxPooling2D
from tensorflow.keras.applications.vgg16 import VGG16
from keras.preprocessing.image import ImageDataGenerator
from tensorflow.keras import optimizers
from keras.models import Model
Keras is a deep learning framework built for Python which provides methods to train deep learning models. Keras has built-in support for CNNs (for computer vision) and has a user-friendly API that makes it easy to quickly prototype deep learning models.
Importing the sequential method, means that all the layers in the model will be arranged in sequence. The importance of ImageDataGenerator is to generate batches of tensor image data with real-time data augmentation. It has very many useful functions such as rescaling, rotating, zooming etc.
The keras.layers import gives us access to layers that we need to build our CNN which are described above. Layers are the building blocks of neural networks.
Optimizers are necessary for improving your model speed and performance. Optimizers shape the model into its most accurate form by playing with model weights.
VGG16 is a convolutional neural network architecture which provides 16 layers. Its a pretrained model. VGG16 is a model employs the transfer learning architecture. Transfer learning is the art of reusing a model on one task and repurposing it on another task.
Pandas library provides built-in methods for data manipulation.
Matplotlib is used for creating graphs where necessary when building our model.
The IPython.display imports a method for viewing images within the notebook.
Now, let’s have a glimpse of our data! 😊
Train Data
The train data has two columns the image and the train data and has 1308 different records!
# Reading the data
train_labels = pd.read_csv("train_labels.csv")
# Show the first 5 rows
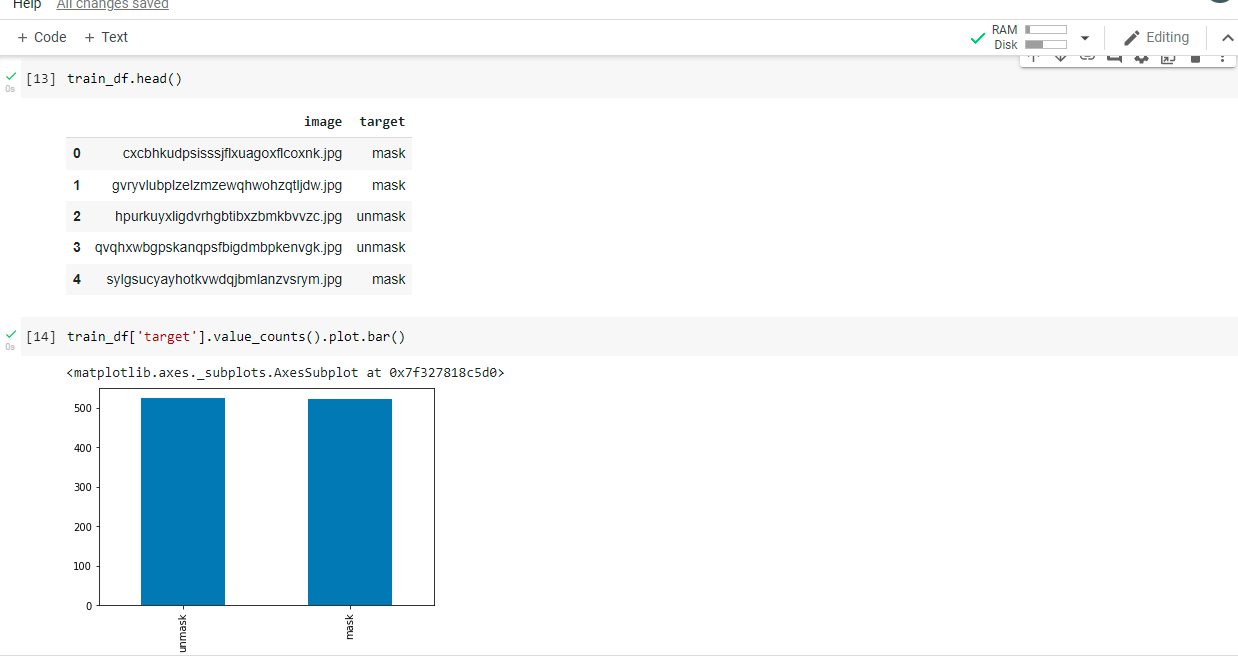
train_labels.head()
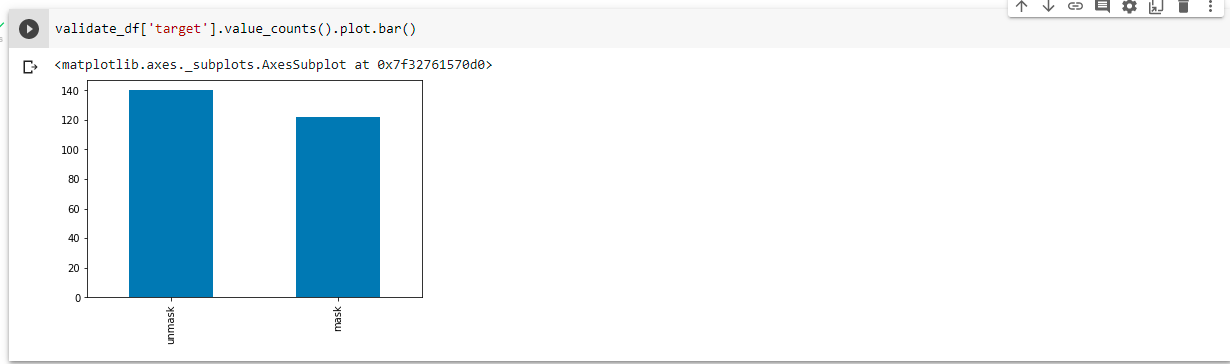
Let’s create a simple plot bar to understand how the train data:
train_labels['target'].value_counts().plot.bar()
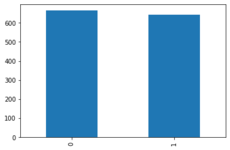
Image Data
This data comes in a zip file. For this we can use the following command to unzip all the files:
# Extracts all the files
!unzip -q images.zip
We can view images using the ShowImage() function:
# We can view the images with the ShowImage functionality
ShowImage("/content/images/aadawlxbmapqrblgxyzarhjasgiobu.png")
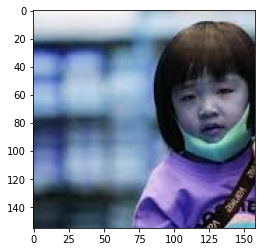
If you found this fun, you can also use the OpenCV Library to view images!
import cv2
import random
import os
# This stores the location of the data source
data = os.listdir("images")
# Picking random sample from data list
sample = random.choice(data)
# The imread method loads image from the sprcified file
img = cv2.imread("images/"+sample)
# The cmap parameter displays the image in gray
plt.imshow(img, cmap="gray")
Sample_submission.csv
This is the file that is used for making submissions after you have created your model.
We should replace the target variables (0,1) into categories (mask, unmask) using the replace method.
train_labels["target"] = train_labels["target"].replace({0: 'unmask', 1: 'mask'})Instantiating the CNN
First, we need to declare how the image data will be passed to the input layer.
# Defining how data is passed to the input layer
image_size = 224
input_shape = (image_size, image_size, 3)
batch_size = 16
As mentioned earlier, convnets take input tensors of the shape - image height, image width and image channels. The images’ input shape from the code above is (224,224,3).
pre_trained_model = VGG16(input_shape=input_shape, include_top=False, weights="imagenet")
for layer in pre_trained_model.layers[:15]:
layer.trainable = False
for layer in pre_trained_model.layers[15:]:
layer.trainable = True
last_layer = pre_trained_model.get_layer('block5_pool')
last_output = last_layer.output
x = GlobalMaxPooling2D()(last_output)
x = Dense(512, activation='relu')(x)
x = Dropout(0.5)(x)
x = Dense(2, activation='softmax')(x)
model = Model(pre_trained_model.input, x)
model.compile(loss='binary_crossentropy',
optimizer=optimizers.SGD(lr=1e-4, momentum=0.9),
metrics=['accuracy'])
model.summary()
Here we are passing our parameters on to our VGG16.
The include_top parameter states whether to include the output layers or not. In case you are fitting your model into your own problem, you don't need it.
The weights parameter specifies what weights to load.
GlobalMaxPooling2D - this is another pooling type where the pooling size is set to equal the input size, so that the max of the entire input is connected as the output value.
Dense implements the operation using the ReLU and Softmax algorithm respectively.
The model compile method defines the model by specifying the optimiser, loss and metrics.
The loss parameter is specified to type 'binary_crossentropy'. This measures how the network will be able to measure its performance on the training data, and thus how it will be able to steer itself in the right direction.
An optimiser is the mechanism through which the network will update itself based on the data it sees and its loss function. The metrics parameter is set to 'accuracy' - here we only care about how the model will perform.
The optimiser is set to Stochastic Gradient Descent Optimiser. This refers to the mechanism through which the network will update itself based on the data it sees and its loss function.
The model summary method is used to see all parameters and shapes in each layers in our models, which will give you the following result:

The total parameters are 14,978,370
The trainable parameters are 7,343,106
The non-trainable parameters are 7,635,264
from keras.callbacks import EarlyStopping, ReduceLROnPlateau
earlystop = EarlyStopping(patience=10)
learning_rate_reduction = ReduceLROnPlateau(monitor='val_acc',patience=2,verbose=1,factor=0.5,min_lr=0.00001)
callbacks = [earlystop, learning_rate_reduction]
Earlystop is a technique that is used to reduce overfitting without comprising on model accuracy. Too many epochs can lead to overfitting, hence the need to apply the technique.
An epoch means training the network with all the training data for one cycle. A forward pass and a backward pass are counted as one pass.
ReduceLROnPlateau is a callback to reduce the learning rate when a metric has stopped improving.
Patience is the number of epochs with no improvement after which the learning rate is reduced.
from sklearn.model_selection import train_test_split
train_df,validate_df=train_test_split(train_labels,test_size=0.2,random_state=42)
train_df = train_df.reset_index(drop='True')
validate_df = validate_df.reset_index(drop='True')
Here, we are importing the train_test_split method from sklearn that basically splits the training data into two separate dataframes - the training and the testing data. random_state parameter sets the seed to the random generator so that your train-test splits are always deterministic.
Next, we can view the final format of the split data:
Train_df
validate_df
Next, we need to categorically encode categorical variables:
# Generate batches of tensor image data with real-time data augmentation
from keras.preprocessing.image import ImageDataGenerator, load_img
# Categorical encodes categorical variables
from tensorflow.keras.utils import to_categorical
Here we are rescaling the images, applying shear in some ranges, zooming the image and flipping the image horizontally:
# Here we are formatting the training data
train_datagen = ImageDataGenerator(rotation_range=15,
rescale=1./255,
shear_range=0.1,
zoom_range=0.2, # zoom range (1-0.2 to 1+0.2)
horizontal_flip=True,
width_shift_range=0.1,
height_shift_range=0.1)
train_generator = train_datagen.flow_from_dataframe(dataframe=train_df,
directory="images/",
x_col="image",
y_col="target",
target_size=(image_size,image_size),
class_mode='categorical',
batch_size=15)
# Here we are formatting images on the validation data
validation_datagen = ImageDataGenerator(rescale=1./255)
validation_generator = validation_datagen.flow_from_dataframe(validate_df,
directory="images/",
x_col="image",
y_col="target",
target_size=(image_size,image_size),
class_mode='categorical',
batch_size=15)
Next we need to fit the model into the training data and we are running it for 100 epochs.
epochs=100
total_validate = validate_df.shape[0]
total_train = train_df.shape[0]
history = model.fit_generator(
train_generator,
epochs=epochs,
validation_data=validation_generator,
validation_steps=total_validate//batch_size,
steps_per_epoch=total_train//batch_size,
callbacks=callbacks)
# Here we are creating a list of pictures - we are appending images on the list.
# Our data source is the original data before splitting to test and train data
target=[]
for i in data:
flag=0
for j in df["image"]:
if(i==j):
flag=1
break;
else:
continue
if(flag==0):
target.append(i)
Then we are creating a test data set using the image data:
#creating a test dataframe with images and the target is umask for all images
test = pd.DataFrame({
'image': target,
'target':"unmask"
})
test.head()
Lastly, we need to pass our test data to the image data generator - to fit the model into the test data:
test_gen = ImageDataGenerator(rescale=1./255)
test_generator = test_gen.flow_from_dataframe(
test,
directory="images/",
x_col="image",
y_col="target",
target_size=(image_size,image_size),
class_mode='categorical',
batch_size=15,
shuffle=False)
nb_samples = test.shape[0]
predict = model.predict_generator(test_generator, steps=np.ceil(nb_samples/batch_size))
The model.predict_generator helps make predictions on new image data.
The np.ceil method is used to find the ceil of the elements of the array
# Here we are converting the submission data to a dataframe
test["target"]=predict
#here we are converting to a csv file
test.to_csv("submission.csv",index=False)
Lastly we save our data on the submission file. When submitting the final result, always ensure that its in csv format.
Conclusion
Congratulations! You have understood basic concepts of CNNs and built a model with keras implementation. With the availability of awesome libraries, there are many ways to approach this problem -Frameworks which can solve the same problem are:
- Fastai Library - check out our starter notebook using this library
- Pytorch Library
Traditional machine learning problems that can also help with the same problem are Support Vector Machines and Random Forests.
Additional resources:
- Grokking Deep learning for Computer Vision by Andrew Trask
- Deep Learning with Python By Francois Chollet
- Programming Computer Vision with Python by Jan Erik
- CNNs
About the author
Joy Wawira is a software developer, technical writer, and data scientist. Follow her on Twitter @jlcodes.